Vehicle Controls

Learn about the various controls necessary for operating and driving the vehicle.

Using the Remote Transmitter

Lock or unlock the doors and trunk.

Models with Remote Engine Start

Models without Remote Engine Start

Notice

Leaving the remote transmitter in the vehicle can result in theft or accidental movement of the vehicle. Always take it with you whenever you leave the vehicle unattended.

Smart Entry System

When you carry the remote transmitter (for example, in a pocket or purse) and it is outside the vehicle and within range (about 32 inches or 80 cm), you can lock or unlock the doors and the trunk without handling the transmitter.

Unlocking/Locking the Doors

To unlock: Grab the driver’s door handle when the vehicle is off to unlock the driver’s door. Grab the front passenger’s door handle to unlock all the doors and the trunk. You can customize this feature’s behavior.
To lock: Press the door lock button on either front door handle. If the remote transmitter is inside the vehicle, neither the doors nor trunk will lock.

Walk Away Auto Lock

When you walk away from the vehicle while carrying the remote transmitter, the doors and trunk can automatically lock if the following conditions are met:
  • The remote transmitter is within a range of 5 feet (1.5 m).
  • All doors and the trunk are closed.
  • There is not an additional remote transmitter inside the vehicle.
Follow these steps (see diagram):
  1. Exit the vehicle, close the door and stay near it. Listen for a beep. The system is activated.
  2. Walk at least 5 feet (1.5 m) away.
  3. Listen for a beep and look for the lights to flash. The doors lock.
To turn on this feature, follow these steps:
  1. From the HOME screen, select Settings.
  2. Select Vehicle.
  3. Select Keyless Access Setup.
  4. Select Walk Away Auto Lock.
  5. Select Enable.

Customizing Door Lock & Unlock Settings

Customize the auto door lock and door unlock settings to your preference. Begin with the vehicle off.

Models with Color Audio

Customizing Door Lock Settings

Customizing Door Unlock Settings

Models with Display Audio

See Customized Features.

Tailgate and Trunk Operation

To drop open the tailgate, pull up in the upper handle. Support the tailgate until it is fully open.
To swing open the tailgate, pull up on the lower handle.
To open the trunk, unlock the doors, then pull up on the trunk release button.
Or, insert the key into the trunk lock cylinder.
The main switch in the glove box disables the trunk release button.
W
Opening or closing a tailgate while anyone is in the path of the tailgate can cause serious injury.

Make sure everyone is clear before opening or closing the tailgate.

W
Allowing passengers to ride in the pickup bed or on the tailgate can result in death or serious injury. Make sure all passengers ride in a seat and wear a seatbelt properly.

In-Bed Conveniences

In-Bed Box

Turn the knobs to the left to open the lid

AC Power Outlet*1

Open the in-bed box. Open the plug cover, insert a powercord slightly, rotate it 90° clockwise, then push it in all the way.

Push the AC power button to turn the system on or off. The maximum power is 400 watts when the engine is running and the vehicle is in Park (P). Otherwise, the maximum power is 150 watts.

The battery charge may be affected by using AC power with truck bed audio* or by heavy power outlet use while the vehicle is idling in Park (P). If this happens, engine idle speed will increase until the battery again has a normal charge.

Notice The AC-power system is not designed for devices needing precise power regulation, nor for devices requiring high initial peak wattage.

Door Operation

Use several methods to lock or unlock the doors.

Using the Lock Tab

To unlock: When you unlock either front door using the lock tab, the specific door (driver’s or passenger’s) unlocks.

To lock: When you lock the door using the lock tab on the driver’s door, all the other doors and the trunk lock at the same time. When you lock the door using the lock tab on the front passenger’s door, only that door locks.

Using the Front Door Inner Handle

When you pull either front door inner handle, the door unlocks and opens.

Unlocking and opening the driver’s door from the inner handle unlocks all the other doors and the trunk.

Using the Master Door Lock Switch

To unlock: Press the unlock side of the switch to unlock all doors and the trunk.

To lock: Press the lock side of the switch to lock all doors and the trunk.

Childproof Door Locks

The childproof door locks prevent the rear doors from being opened from the inside regardless of the position of the lock tab.

Slide the lever in the rear door to the lock position, and close the door.

Open the door using the outer door handle.

Power Window Operation

The power windows can be opened and closed by using the switches on the doors when the vehicle is on. The switches on the driver’s side can be used to open and close all the windows.

Automatic Operation

To open: Push the switch down firmly.

To close: Pull the switch up firmly.

The window opens or closes completely. To stop the window at any time, push or pull the switch again briefly.

Manual Operation

To open: Push the switch down lightly.

To close: Pull the switch up lightly.

Release the switch when the windows reach the desired position.

Power Window Lock

Push in the power window lock button so only the driver’s window can be operated.

An indicator appears in the button when window lock is on.

W

Closing a power window on someone’s hands or fingers can cause serious injury.

Make sure your passengers are away from the windows before closing them.

Back Window*1

To open: Push the switch back.

To close: Pull the switch forward.

W
Closing a power window on someone’s hands or fingers can cause

serious injury.

Make sure your passengers are away from the windows before closing them.

Power Moonroof Operation*1

The moonroof can be opened and closed when the vehicle is on by using the switch on the ceiling.

Automatic Operation

To open: Push the switch back firmly to the second detent, then release.

To close: Push the switch forward firmly to the second detent, then release.

The moonroof opens or closes completely. To stop the moonroof at any time, push the switch briefly.

Manual Operation

To open: Push the switch back firmly to the second detent, then release.

To close: Push the switch forward firmly to the second detent, then release.

The moonroof opens or closes completely. To stop the moonroof at any time, push the switch briefly.

Moonroof Tilt

To tilt: Push the center of the switch.

To close: Push the switch forward firmly, then release.

Notice Opening the moonroof in below freezing temperatures or when it is covered with snow or ice can damage the moonroof panel or motor.
W
Closing the moonroof on someone’s hands or fingers can cause serious injury.

Make sure your passengers are away from the moonroof before closing it.

Interior and Exterior Lights

Operate interior and exterior lights when the vehicle is on or off.

Brightness Control

Adjust instrument panel brightness when the vehicle is on.

To brighten: Press the + button.

To dim: Press the - button.

A beep sounds when the brightness reaches its minimum or maximum.

Interior Lights

Change the interior light settings using the switch on the ceiling.

ON position: Interior lights remain on.

Door-activated position: Interior lights come on when any of the doors are opened, the driver’s door is unlocked, or the vehicle is turned off.

OFF position: Interior lights remain off.

Map Lights

Press the front map lights to turn on or off.

There are also map lights on the ceiling for the rear seats. Turn them on or off when the front interior light switch is in the door-activated position.

Bed Lights

Press the button to turn the bed lights on or off. The vehicle must be in Park (P).

The lights come on automatically when the tailgate is swung open or the trunk is opened.

Exterior Lights

Rotate the switches on the lever to operate the exterior lights. Push the lever forward to turn on the high beams. Return the lever to its original position for low beams.
OFF: All exterior lights are off.
Turn on exterior lights except headlights.
AUTO: Turn on the automatic lighting feature. Headlights turn on or off depending on ambient brightness when the vehicle is on. Headlights automatically come on after the wipers are engaged for a certain time. The headlights come on when you unlock a door in dark areas with the headlight switch in AUTO.
Turn on all exterior lights including headlights.
Turn fog lights on or off*1.

One-Touch Turn Signal

Use this quick and convenient method to signal a lane change.

Lightly push the turn signal lever up or down for a three-blink sequence.

For a continuous signal, push the lever up or down until it locks into place.

Auto High Beam System*1

Automatically changes the low beam headlights to high beam headlights when necessary.

How It Works

When you are driving at night above 25 mph (40 km/h) and the headlight lever is in the low beam position with the switch rotated to AUTO, the system changes between low and high beams depending on the brightness of the vehicle lights ahead of you.

If a vehicle is detected ahead of you, the headlights stay in low beams. If the system does not detect any vehicles ahead of you, the headlights change to high beams.

Certain conditions, such as weather and brightness of other vehicles’ lights, can affect system operation.

Turning the System On or Off

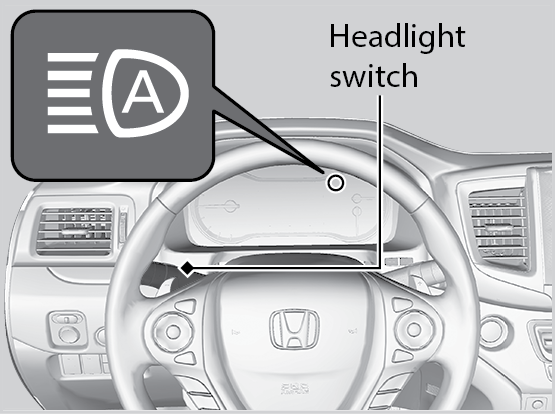
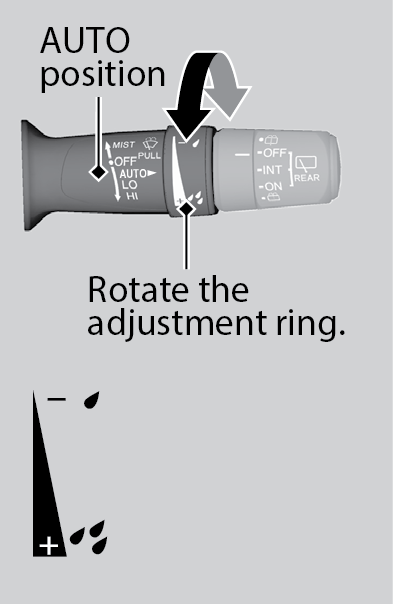
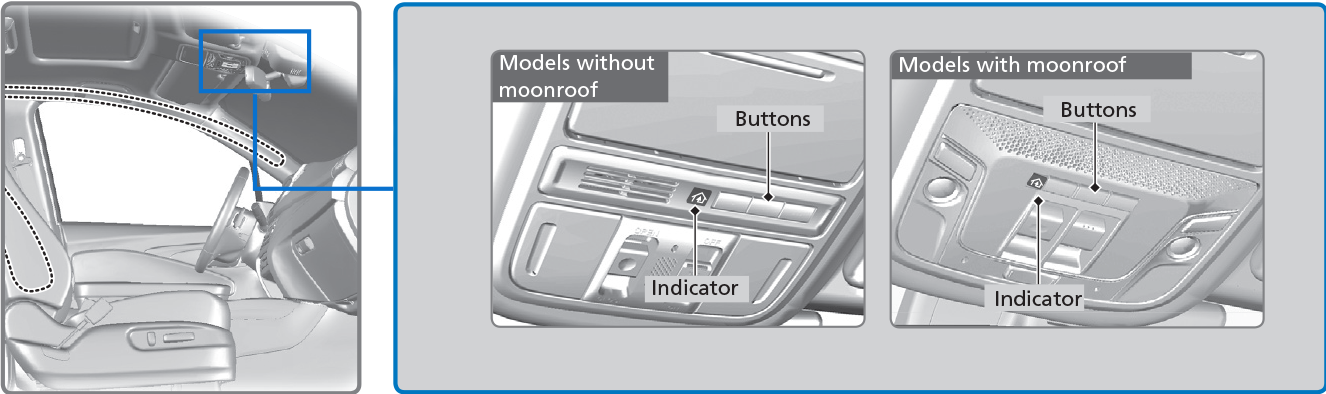
Make sure the headlight lever is in the low beam position with the switch rotated to the AUTO position.

The auto high beam system indicator comes on.

To disable the system: Pull and hold the headlight lever toward you for about 40 seconds, until the indicator flashes twice.

To enable the system: Pull and hold the headlight lever toward you for about 30 seconds, until the indicator flashes once.

To temporarily cancel operation, do either of the following:
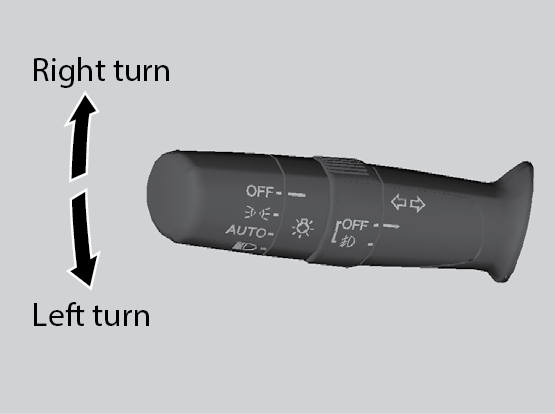
  • Flash the high beams by moving the lever toward you. Flash the high beams again to resume auto high beam operation.
  • Engage high beams by moving the lever into the high beam position. Return the lever to the low beam position to resume auto high beam operation.

If you find the timing of beam changes inconvenient for driving, change the beams manually.

For the system to work properly:
  • Do not place an object that reflects light on the dashboard.
  • Keep the windshield around the camera clean. When cleaning the windshield, be careful not to apply windshield cleanser to the camera lens.
  • Do not attach an object, sticker or film in the area around the camera.
  • Do not touch the camera lens.

If the camera receives a strong impact or requires repair, consult a dealer.

If you see the message “Some Driver Assist Systems Cannot Operate: Clean Front Windshield,” park your vehicle in a safe place. Wipe away debris blocking the windshield, then start driving again. If the message remains even after driving for a while with the clean windshield, have your vehicle checked by a dealer.

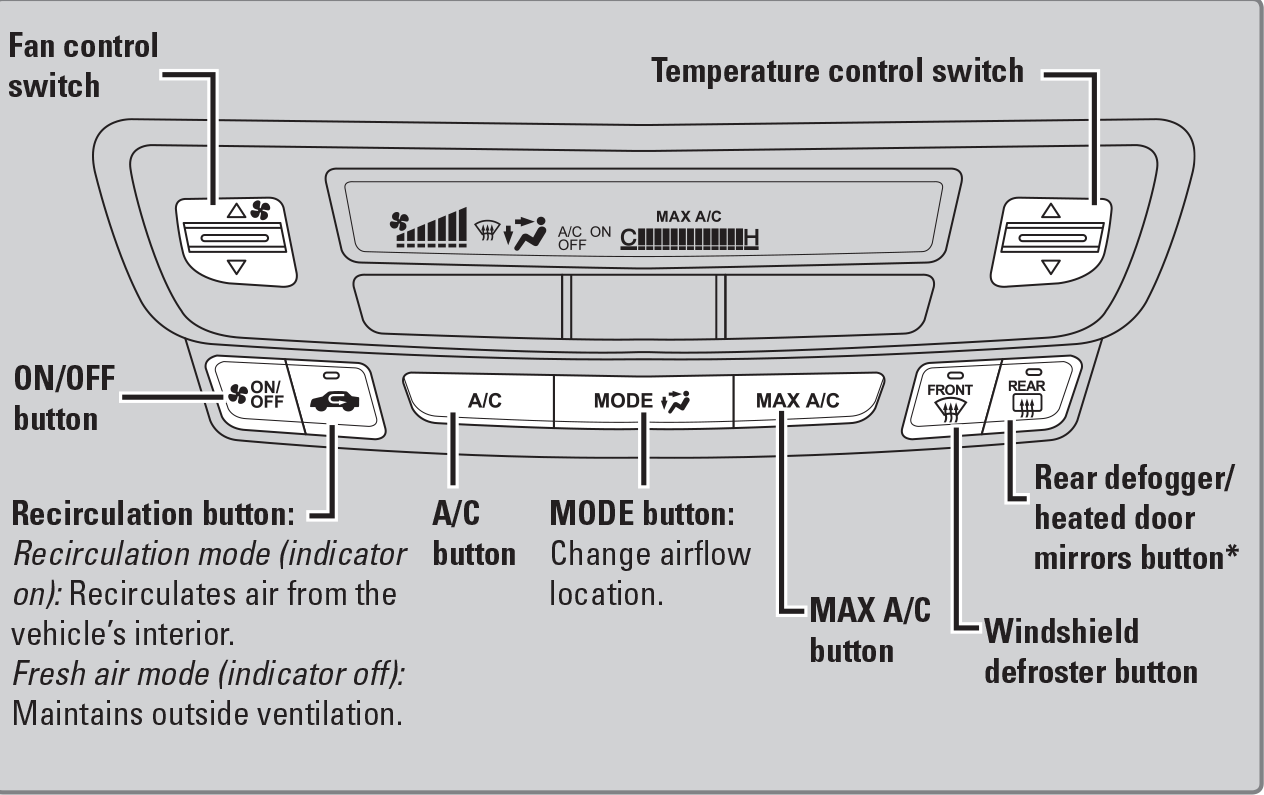
If you see a message that the camera is too hot, use the climate control system to cool the interior. Defroster mode will direct airflow toward the camera.

Wiper Operation

The windshield wipers and washers can be used when the vehicle is on.

Front Wipers

Move the wiper lever up or down to the desired position.

Headlight-Wiper Integration

When the headlights are in the AUTO position, they automatically turn on when the front wipers operate several times within a certain interval. The headlights turn off shortly after the wipers are turned off or if there is enough ambient light.

Intermittent (INT) Wipers*1

When you move the lever to the INT position, the wipers operate based on the delay adjustment.

Rotate the adjustment ring to adjust the wiper delay.

Automatic Rain-Sensing Wipers

When you move the lever to the AUTO position while driving in rainy weather, the wipers operate based on the amount of detected rainfall.

Rotate the adjustment ring to adjust the rainfall sensor sensitivity. Set the wipers to OFF when the rain stops.

Notice Ensure the wiper lever is in the OFF position before entering a car wash or cleaning the windshield. Wiper-system damage may happen otherwise.
Notice Do not use the wipers when the windshield is dry. The windshield will get scratched, or the rubber blades will get damaged.

In cold weather, the blades may freeze to the windshield, becoming stuck. Operating the wipers in this condition may damage the wipers. Use the defroster to warm the windshield, or manually clear the windshield of ice and snow before turning on the wipers.

Adjusting the Seats

Make seat adjustments before driving to ensure the best comfort and safety.

Adjusting the Front Seats

Adjust the driver’s seat as far back as possible while allowing you to maintain full control of the vehicle. You should be able to sit upright and well back in the seat, adequately press the pedals without leaning forward, and grip the steering wheel comfortably. The passenger’s seat should be adjusted so that it is as far back from the front airbag in the dashboard as possible.

The National Highway Traffic Safety Administration and Transport Canada recommend that drivers allow at least 10 inches (25 cm) between the center of the steering wheel and the chest.

Front Power Seats*1

Front Manual Seats*1

W
Sitting too close to a front airbag can result in serious injury or death if the front airbags inflate.

Always sit as far back from the front airbags as possible while maintaining control of the vehicle.

W
Reclining the seat-back too far can result in serious injury or death in a crash.

Adjust the seat-back to an upright position, and sit well back in the seat.

W
Sitting improperly or out of position can result in serious injury or death in a crash.

Always sit upright, well back in the seat, with your feet on the floor.

Driving Position Memory System*1

You can store two driver’s seat and door mirror positions into memory when the vehicle is on using the buttons on the driver's door. When you unlock and open the driver’s door, the driver’s seat slides rearward to allow for easy entry. The seat slides forward to the stored position and the other items adjust when the vehicle is turned on. The items adjust automatically to one of the two preset positions.
  1. Adjust the seat and mirrors to your preferred positions.
  2. Press SET.
  3. Press and hold memory button 1 or 2.

    You will her two beeps when the memory is set.

  4. Press one of the memory buttons to recall previously stored positions.

    Lumbar positions cannot be stored.

Adjusting the Head Restraints

Your vehicle is equipped with head restraints in all seating positions. Head restraints are most effective for protection against whiplash and other rear-impact crash injuries.

The center of the back of the occupant’s head should rest against the center of the restraint. The tops of the occupant’s ears should be level with the center height of the restraint.

To raise the head restraint: Pull it upward.

To lower the head restraint: Push it down while pressing the release button.

To remove the head restraint: Pull the restraint up as far as it will go. Then push the release button, and pull the restraint up and out.

To reinstall a head restraint: Insert the legs back in place, then adjust the head restraint to an appropriate height while pressing the release button. Pull up on the restraint to make sure it is locked in position.

For a head restraint system to work properly:
  • Do not hang any items on the head restraints or from the restraint legs.
  • Do not place any objects between an occupant and the seat-back.
  • Install each restraint in its proper location.
W
Improperly positioning head restraints reduces their effectiveness and increases the likelihood of serious injury in a crash.

Make sure head restraints are in place and positioned properly before driving.

W
Failure to reinstall, or correctly reinstall, the head restraints can result in severe injury during a crash.

Always replace the head restraints before driving.

Floor Mats

Position the front and rear seat floor mats properly and anchor them. If they are not properly positioned, the floor mats can interfere with the front seat functions.

Do not put additional floor mats on top of the anchored mats.

Adjusting the Rear Seats

Separately raise or lower the left and right rear-seat cushions to make room for luggage.

Folding Up the Rear Seats

  1. To raise the driver’s side rear seat, store the armrest in the seat back.
  2. Pull and hold the release handle. If the handle is difficult to move, release the handle, push on the seat cushion until the seat leg is secure in the floor guide, then try again.
  3. Lift the seat cushion until the legs disengage from the floor guide.
  4. Release the handle.
  5. Raise the cushion, pushing it firmly against the seat back until it locks.

Folding Down the Rear Seats

  1. Hold the folded seat cushion.
  2. Pull the release handle until the cushion unlocks.
  3. Hold the cushion as you slowly lower it.
  4. Set the seat leg in the floor guide.
  5. Push on the cushion to ensure the legs engage the floor guide.

The seat leg is not designed to lock or latch in the floor guide. The seat lock is located in the seat hinge.

Adjusting the Steering Wheel

The steering wheel height and distance from your body can be adjusted so that you can comfortably grip the steering wheel in an appropriate driving posture.
  1. Pull down the steering wheel adjustment lever.
  2. Move the steering wheel up, down, in, or out.
  3. Push up the lever to lock the steering wheel in place.
W
Adjusting the steering wheel position while driving may cause you to lose control of the vehicle and be seriously injured in a crash.

Adjust the steering wheel only when the vehicle is stopped.

Adjusting the Mirrors

Adjust the angle of the mirrors for the best visibility when you are sitting in the correct driving position.

Rearview Mirror with Day/Night Positions*1

Manually adjust the position to reduce headlight glare from vehicles behind you. Flip the tab to switch between day and night positions.

Automatic Dimming Rearview Mirror*1

When driving after dark, the automatic dimming function reduces glare in the rearview mirror from headlights behind you. This cannot be turned off.

The function cancels when the shift lever is in Reverse (R).

Power Door Mirrors

Adjust the power door mirrors when the vehicle is on.

L/R selector switch: Select the left or right mirror.

After adjusting the mirror, return the switch to the center position.

Mirror position adjustment switch: Press the switch left, right, up, or down to move the mirror.

Folding door mirror button*4: Press to fold the door mirrors in or out.

Reverse Tilt Door Mirrors*1

Either side door mirror can tilt downward when you shift to Reverse (R) to improve visibility on the selected side of the vehicle when reversing. The mirror returns to its original position when you shift out of Reverse.

When in Reverse, slide the selector switch to the left or right side.

Homelink® Garage Opener*1

Program your vehicle to operate up to three remote-controlled devices around your home—such as garage doors, lighting, or home security systems—using the buttons on the ceiling.

Training a Button

Park near the system you want to program, and follow the instructions in the flowchart below.

To retrain a button or erase codes, see the Owner’s Manual at owners.honda.com (U.S.) or www.myhonda.ca (Canada). If you need help, call HomeLink at (800) 355-3515 or visit www.homelink.com.

Air Conditioning System*1

Manually control the front and rear heating and cooling in your vehicle’s interior using the buttons on the dashboard.

Front Operation

Climate Control System*1

The automatic climate control system can maintain your preferred interior temperature by selecting the proper mix of heated or cooled air and fan speed. Use the buttons on the dashboard to control both front and rear operation.

Front Operation - Climate Control System

Rear Operation

Heated Windshield Button*4

Turn the vehicle on. Press the heated windshield button to de-ice the windshield.

The heated windshield may automatically activate when the outside temperature is below 4°C, and deactivate when the temperature reaches 6°C.

Heated Steering Wheel*1

Press the button to heat the steering wheel when the vehicle is on. Press the button again to turn off the heating.

Seat Heaters and Ventilation*1

Quickly warm or cool the seats when the vehicle is on.

Front Seat Heaters*1

Press the LO or HI side of the switch to activate seat heat. Return the switch to the middle position to cancel seat heat.

Front Seat Heaters or Ventilation*1

Press the seat heater or the seat ventilation button to cycle through settings. The appropriate indicator (red for heat, blue for ventilation) appears for each setting.

  • Once - The HI setting (three indicators on)
  • Twice - The MID setting (two indicators on)
  • Three times - The LO setting (one indicator on)
  • Four times - The OFF setting (no indicators on)

Rear Outer Seat Heaters*1

Use the buttons on the rear of the center console to operate the rear outer seat heaters.

Press either seat heater button to toggle through the HI, MID, LO, or OFF settings. The appropriate indicator appears for each setting.
W
Heat-induced burns are possible when using seat heaters.

Persons with a diminished ability to sense temperature (e.g., persons with diabetes, lower-limb nerve damage, or paralysis) or with sensitive skin should not use the seat heaters.

Customized Features

Use the Settings menu to customize certain features when the vehicle is stopped and the power mode is ON.

Models with Color Audio

  • Press the MENU/CLOCK button, then select Settings. To customize the phone settings, press the Phone button, then select Phone Setup.

Models with Display Audio


  • Select Settings, then select a setting item.

Setting the Clock

On vehicles without navigation, use the interface dial to adjust the time in the clock display. On vehicles with navigation, the time is automatically set using GPS signals.
  1. Press the SETTINGS button.
  2. Select Clock Settings.
  3. Select Clock Adjustment.
  4. Tilt the interface dial to choose the item you wish to change. Rotate the interface dial to change the value. Press the interface dial to exit the screen.
  5. Press the BACK button to exit out of the menus.