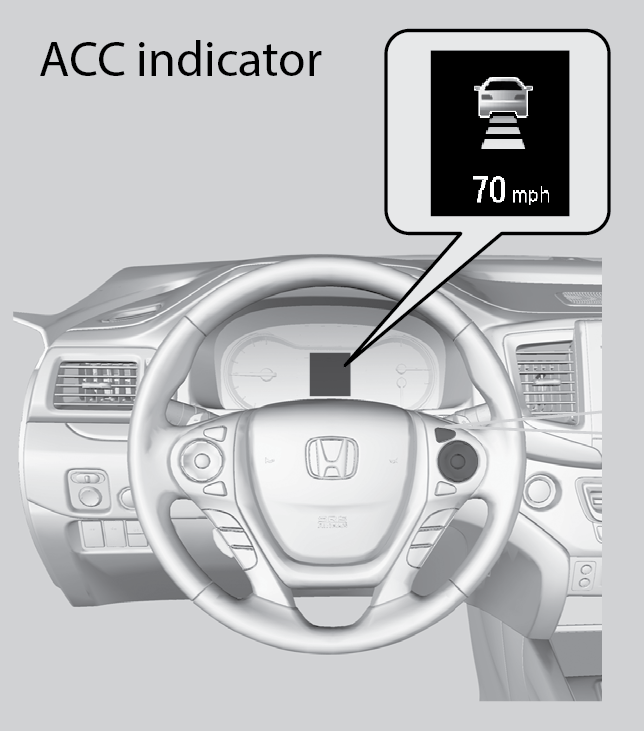
Driving

Learn about preparation for driving, as well as other features.

Before Driving

Check the following items before you begin driving.

Exterior Checks

  • Make sure there are no obstructions on the windows, door mirrors, exterior lights, or other parts of the vehicle.

  • Remove any frost, snow, or ice.
  • Make sure the hood is securely closed.
  • Make sure the tailgate is fully closed when it is not being used as an extended pickup bed.
  • Heat from the engine and exhaust can ignite flammable materials left under the hood, causing a fire. If you’ve parked your vehicle for an extended period, inspect and remove any debris that may have collected, such as dried grass and leaves that have fallen or have been carried in for use as a nest by a small animal. Also check under the hood for leftover flammable materials after you or someone else has performed maintenance on your vehicle.
  • Make sure the tires are in good condition.
  • Make sure there are no people or objects behind or around the vehicle.
    Notice If the doors are frozen shut, use warm water around the door edges to melt any ice. Do not try to force them open, as this can damage the rubber trim around the doors. When done, wipe dry to avoid further freezing.

Interior Checks

  • Store or secure all items on board properly.
  • Do not pile items higher than the seat height.
  • Do not place anything in the front seat footwells. Make sure to secure the floor mats.
  • If you have any animals on board, do not let them move freely around in the vehicle.
  • Securely close and lock all doors and the trunk.
  • Adjust your seating position, mirrors, and steering wheel properly.
  • Make sure items placed on the floor behind the front seats cannot roll under the seats.
  • Everyone in the vehicle must fasten their seat belt.
  • Make sure that the indicators in the instrument panel come on when you start the vehicle, and go off soon after.
W
Improper accessories or modifications can affect your vehicle’s handling, and stability, and performance, and cause a crash in which you can be seriously hurt or killed.

Follow all instructions in the vehicle owner’s manual regarding accessories and modifications.

Driving Guidelines for Your Utility Vehicle

Utility vehicles have a significantly higher rollover rate than other types of vehicles. To prevent rollovers or loss of control:
  • Take corners at slower speeds than you would with a passenger vehicle.
  • Avoid sharp turns and abrupt maneuvers whenever possible.
  • Do not modify your vehicle in any way that would raise its center of gravity.
  • Never carry more than 165 lbs (75 kg) of cargo on the roof rack (Honda accessory).

Your vehicle has been designed primarily for use on pavement, however, its higher ground clearance allows you to occasionally travel on unpaved roads. It is not designed for trail-blazing, or other challenging off-road activities.

If you decide to drive on unpaved roads, you will find that it requires somewhat different driving skills and that your vehicle will handle somewhat differently than it does on pavement. Pay attention to the precautions and tips in this section, and get acquainted with your vehicle before leaving the pavement.
W
Improperly operating this vehicle on or off pavement can cause a crash or rollover in which you and your passengers can be seriously injured or killed.
  • Follow all instructions and guidelines in this owner’s guide.
  • Keep your speed low, and don’t drive faster than conditions permit.
In addition:
  • During the first 600 miles (1,000 km)of operation, avoid sudden acceleration or full throttle operation as to not damage the engine or powertrain.
  • Avoid hard braking for the first 200 miles (300 km). You should also follow this when the brake pads are replaced.

Maximum Load Limit

Carrying too much cargo or improperly storing it can affect your vehicle’s handling, stability, stopping distance, and tires, and make it unsafe.

Maximum Load For Your Vehicle

The maximum load for your vehicle type is:

  • 2WD without moonroof: 1,444 lbs (655 kg).
  • 2WD with moonroof: 1,400 lbs (635 kg).
  • AWD without moonroof: 1,543 lbs (700 kg).
  • AWD with moonroof: 1,477 lbs (670 kg).

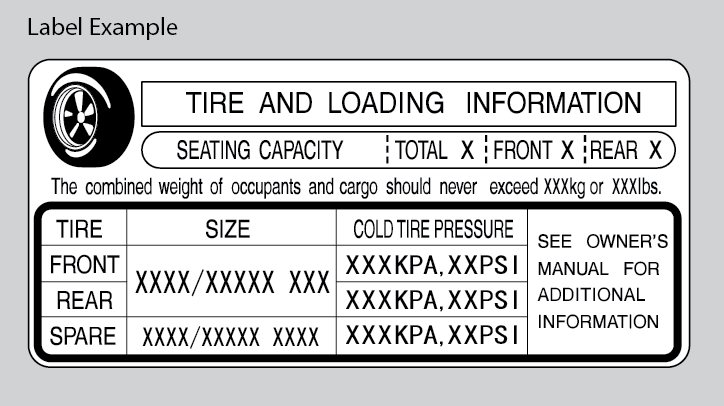
See the Tire and Loading Information label on the driver’s doorjamb.

W
Overloading or improper loading can affect handling and stability and cause a crash in which you can be hurt or killed.

Follow all load limits and other loading guidelines in this guide.

W
Never let passengers ride in the pickup bed, in the trunk, or on the bed rails. This could cause very serious injuries or death. No one should ride in any position that is not equipped with seats and seat belts.

The headlight aim on your vehicle was set by the factory, and does not need to be adjusted. However, if you regularly carry heavy items in the trunk or tow a trailer, have the aiming readjusted at your dealer or by a qualified technician.

This figure includes the total weight of all occupants, cargo, and accessories, and the tongue load if you are towing a trailer. Below are the steps for determining the correct load limit:
  1. Locate the statement “The combined weight of occupants and cargo should never exceed XXX kg or XXX lbs.” on your vehicle’s placard.
  2. Determine the combined weight of the driver and passengers that will be riding in your vehicle.
  3. Subtract the combined weight of the driver and passengers from XXX kg or XXX lbs.
  4. The resulting figure equals the available amount of cargo and luggage load capacity. For example, if the “XXX” amount equals 1,400 lbs. (635 kg) and there will be five 150 lbs. passengers in your vehicle, the amount of available cargo and luggage load capacity is 650 lbs. (1,400 - 750 (5 x 150) = 650 lbs.).
  5. Determine the combined weight of luggage and cargo being loaded on the vehicle. That weight may not safely exceed the available cargo and luggage load capacity calculated in step 4.
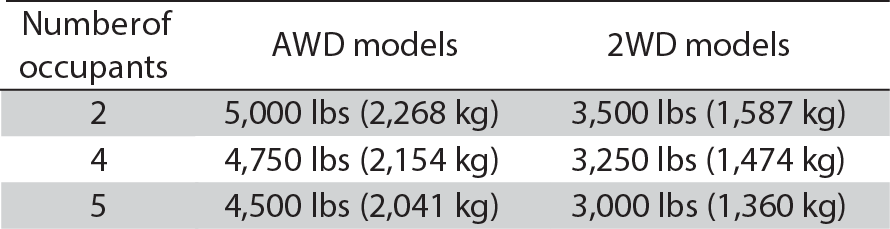
  6. If your vehicle will be towing a trailer, load from your trailer will be transferred to your vehicle. Consult the Owner’s Manual to determine how this reduces the available cargo and luggage load capacity of your vehicle.

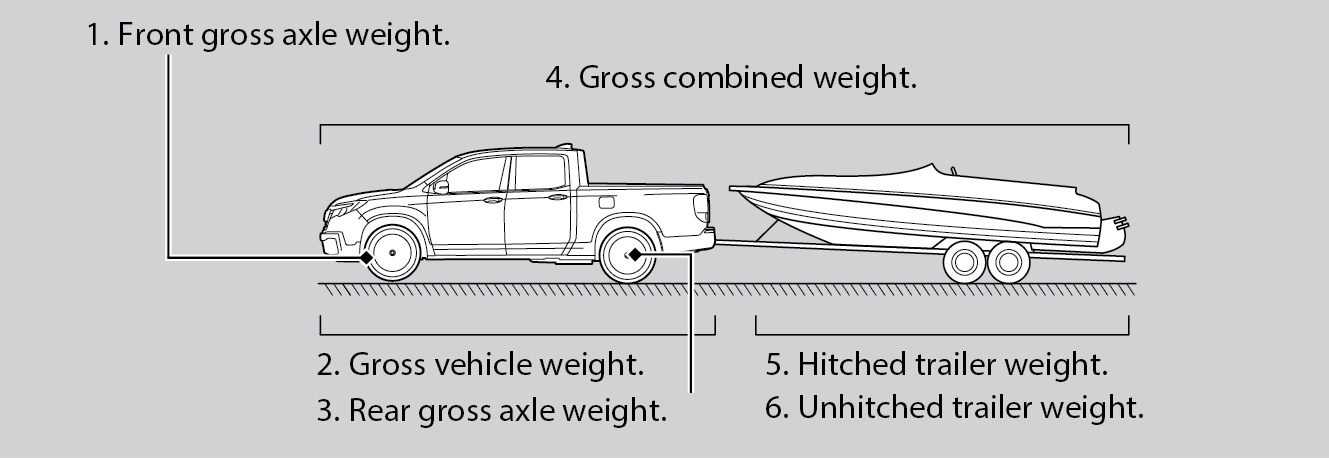
In addition, the total weight of the vehicle, all occupants, accessories, cargo, and trailer tongue load must not exceed the Gross Vehicle Weight Rating (GVWR) or the Gross Axle Weight Rating (GAWR). Both are on a label on the driver’s doorjamb.

Towing a Trailer

Your vehicle can tow a trailer if you carefully observe the load limits, use the proper equipment, and follow the towing guidelines. See the Owner’s Manual at owners.honda.com (U.S.) or myhonda.ca (Canada) for more information.

Towing Load Limits

Total trailer weight

Do not exceed the maximum allowable weight of the trailer, cargo and everything in or on it shown in the table below. Towing loads in excess of this can seriously affect vehicle handling and performance and can damage the engine and drivetrain.
Each weight limit is calculated based on the following conditions:
  • Occupants fill seats from the front of the vehicle to the back.
  • Each occupant weighs 150 lbs (68 kg).
  • Each occupant has 15 lbs (7 kg) of cargo in the cargo area.

Any additional weight, cargo, or accessories reduce the maximum trailer weight and maximum tongue load.

Tongue Load

The weight of the tongue with a fully loaded trailer on the hitch should be approximately:

  • Boat trailers: 5 - 15% of the total trailer weight
  • Other trailers: 10 - 15% of the total trailer weight

To estimate the tongue load

Excessive tongue load reduces front tire traction and steering control. Too little tongue load can make the trailer unstable and cause it to sway.

You can estimate the tongue load by measuring the trailer hitch height from the ground in the following steps:
  1. Park the vehicle on level ground.
  2. Measure the distance between the ground and the bottom of the trailer hitch.
  3. Connect the fully loaded trailer to the hitch.
  4. Measure the distance between the ground and the bottom of the trailer hitch again.
  5. Subtract the second measurement from the first measurement, then refer to the following table.

If the difference becomes more than indicated in the table, distribute the load or remove cargo as needed.

How to weigh the trailer loads using a public scale

Check each weight in the order indicated as shown. Refer to the table below for each weight's limit except for the tongue load.
  • If you cannot weigh the rear axle, subtract 1 from 2.
  • The maximum gross combined weight (4) decreases by 2% for every 1,000 feet (305m) of elevation.
  • To calculate the tongue load, subtract 5 from 6.
  • Refer to the trailer owner's manual for additional information.

Fully load the vehicle and trailer. An attendant who watches the scale is needed as all occupants should stay in the vehicle.

If a public scale is not available, add the estimated weight of your cargo load to the weight of your trailer (as quoted by the manufacturer), and then measure the tongue load with an appropriate scale or tongue gauge or estimate it based on cargo distribution.

Pre-tow Checklist

When preparing to tow, and before driving away, ensure the following:

  • The vehicle has been properly serviced, and the suspension and the cooling system are in good operating condition.
  • Avoid towing a trailer during your vehicle’s first 600 miles (1,000 km).
  • The trailer has been properly serviced and is in good condition.
  • All weights and loads are within limits. Never exceed the gross weight ratings.
  • Check if all loads are within limits at a public scale.
  • The hitch, safety chains, and any other attachments are secure.
  • All items in or on the trailer are properly secured and cannot shift while you drive.
W
Exceeding any load limit or improperly loading your vehicle and trailer can cause a crash in which you can be seriously hurt or killed.

Check the loading of your vehicle and trailer carefully before starting to drive.

Your vehicle should not be used to carry a slide-in camper. If you install a truck cap, be sure it is properly installed and does not exceed your vehicle's load limits see Maximum Load Limit.

Towing Behind A Motorhome

Your vehicle is not designed to be towed behind a motorhome. If your vehicle needs to be towed in an emergency, refer to Emergency Towing.

Remote Engine Start*1

Start your vehicle’s engine using the remote transmitter before you enter the vehicle.

Make sure the vehicle is in a safe location when using remote engine start (i.e., a well-ventilated area, away from any flammable materials).

Starting the Engine

Press the Lock button, then press and hold the Engine button within 5 seconds to remotely start the engine.

  • The engine runs for up to 10 minutes. To extend the run time for another 10 minutes, repeat the procedure during the initial 10 minutes.

  • While the engine is running, the climate control system adjusts the cabin temperature, the security system remains on, and lights and accessories remain off.

Stopping the Engine

Press and hold the Engine button.

The engine will also stop if it has been running for more than 10 minutes, or if any door is opened without using the remote or smart entry.

W

Engine exhaust contains toxic carbon monoxide gas.

Breathing carbon monoxide can kill you or cause unconsciousness.

Never use the remote engine starter when the vehicle is parked in a garage or other area with limited ventilation.

Starting to Drive

Turn on the vehicle and start the engine to begin driving.

Before Starting the Engine

Check that the transmission is in Park (P), then press the brake pedal. Keep your foot firmly on the brake pedal when starting the engine. Release the parking brake, if necessary or see Parking Brake.

The engine is harder to start in cold weather and in thinner air found at altitudes above 8,000 feet (2,400 m).

When starting the engine in cold weather, turn off all electrical accessories such as the lights, climate control system, and rear defogger in order to reduce battery drain.

Changing the Power Mode

Use the ENGINE START/STOP button to cycle through power modes or start the engine.

Accessory or On mode: Press the ENGINE START/STOP button once without pressing the brake pedal for Accessory mode. Press it again for On mode.

Starting the engine: Press and hold the brake pedal, then press the ENGINE START/STOP button. Keep your foot firmly on the brake pedal when starting the engine.

Turning the vehicle off: Shift to Park (P) or apply the parking brake, then press the ENGINE START/STOP button.

Shifting

Change the shift position based on your driving needs.

Shift Lever

Park (P): Used for parking, starting and stopping the engine. Press the brake pedal, then press the release button to shift.

Reverse (R): Used for reversing.

Neutral (N): Used for idling.

Drive (D): Used for normal driving.

Low (L): Used for stronger engine power and braking when driving in hilly terrain.

D4: Press the D4 button when the shift lever is in Drive. Used for going up or down hills .

Notice When you change the shift lever from D to R and vice versa, come to a complete stop and keep the brake pedal depressed. Operating the shift lever before the vehicle has come to a complete standstill can damage the transmission.

Braking

Slow down or stop your vehicle, and keep it from moving when parked.

Foot Brake

Press the brake pedal to slow down or stop your vehicle from moving.

Parking Brake

Keep the vehicle from moving when it is parked.

To apply: Press the parking brake with your foot.

To release: Press the brake pedal, then press the parking brake until it releases.

Notice Release the parking brake fully before driving. The rear brakes and axle can be damaged if you drive with the parking brake applied.

Brake Assist System

During hard or emergency braking, the system increases braking force. The brake pedal may move slightly or make a noise; this is normal. Continue to hold the brake pedal firmly down.

Anti-Lock Brake System (ABS)

During hard or emergency braking, the system rapidly pumps the brakes to prevent wheel lockup and help you maintain steering control. Do not pump the brake pedal, rather continue to hold it firmly down.

When ABS activates, you may notice vibrations through the brake pedal or the vehicle body, the brake pedal depressing further than usual, or hear a motor noise from the engine compartment. These are all normal.

In normal use, the ABS system will occasionally cause a motor sound from the engine compartment, especially when the engine is first started or after repeated use of the brakes.

Notice

The ABS may not function correctly if you use an incorrect tire type and size.

Intelligent Traction Management System

Adjusts vehicle handling performance while driving on various road surfaces.

Press the Mode button to select one of four appropriate modes. The mode you select appears on the multi-information display (MID).

Normal: Provides balanced driving performance on most road surfaces.

Snow: Use when driving on snowy road surfaces.

Mud*1: Use when driving on muddy roads or off-road surfaces.

Sand*1: Use when driving on a soft, sandy road or off-road surfaces.

Cruise control/adaptive cruise control* is not available when Snow, Mud, or Sand is selected.

Eco Assist System

Can help improve fuel economy by adjusting the performance of the engine, climate control system and cruise control.

ECON Button

Press the ECON button to turn the system on or off. The ECON Mode indicator appears when the system is turned on.

Ambient Meter

Color-coded bars around the speedometer change based on your driving style and brake or accelerator pedal operation.

Green: Fuel efficient driving

Light green: Moderate acceleration/deceleration

White: Aggressive acceleration/deceleration

Vehicle Stability Assist® (VSA) system

Also known as Electronic Stability Control (ESC), VSA helps to stabilize the vehicle during cornering if the vehicle turns more or less than what was intended. It assists in maintaining traction on slippery surfaces by regulating engine output and selectively applying the brakes.

Turning VSA On or Off

VSA is turned on every time you start the engine, even if you previously turned it off. If you turn VSA off, your vehicle has normal braking and cornering ability, but VSA traction and stability enhancement become less effective.

Press and hold the VSA OFF button until you hear a beep to turn VSA on or off. The VSA OFF indicator appears when the system is off.

Traction control becomes less effective, which may make it easier when trying to free your vehicle if it is stuck in mud or snow.

Honda Sensing*1

HondaSensing™ is a driver support system which employs the use of two distinctly different kinds of sensors, a radar sensor located in the front grille and a front sensor camera mounted to the interior side of the windshield, behind the rear view mirror.

These are the components of Honda Sensing:

Adaptive Cruise Control (ACC)*1: Helps maintain a constant vehicle speed and a set following interval behind a vehicle detected ahead of yours, without you having to keep your foot on the brake or the accelerator.

Road Departure Mitigation (RDM) System*1: Alerts and helps to assist you when the system detects a possibility of your vehicle unintentionally crossing over detected lane markings and/or leaving the roadway altogether.

Lane Keeping Assist System (LKAS)*1: Provides steering input to help keep the vehicle in the middle of a detected lane and provides tactile and visual alerts if the vehicle is detected drifting out of its lane.

Collision Mitigation Braking System™ (CMBS™)*1: Can assist you when there is a possibility of your vehicle colliding with a vehicle or a pedestrian detected in front of yours. The CMBS™ is designed to alert you when a potential collision is determined, as well as to reduce your vehicle speed to help minimize collision severity when a collision is deemed unavoidable.

Cruise Control*1

Maintain a constant vehicle speed without having to keep your foot on the accelerator pedal. Use cruise control on freeways or open roads where you can travel at a constant speed with little acceleration or deceleration.

Cruise control is not available when Snow, Mud*1 or Sand*1 is selected for Intelligent Traction Management (see Intelligent Traction Management System.

Activating and Setting the Vehicle Speed

  1. Press the CRUISE button. The CRUISE MAIN indicator appears.
  2. Accelerate to the desired speed (above 25 mph/ 40 km/h). Take your foot off the pedal and press the -/SET button to set the speed. The CRUISE CONTROL indicator appears.

Adjusting the Vehicle Speed

Press the RES/+ button to increase speed or the -/SET button to decrease speed.

Each time you press the button, the vehicle speed is increased or decreased by about 1 mph (1.6 km/h). If you keep the button pressed, the vehicle speed increases or decreases until you release it.

Canceling Cruise Control

Press the CANCEL button or the brake pedal. The CRUISE CONTROL indicator goes off.

After cruise control has been canceled, you can still resume the prior set speed by pressing the RES/+ button while driving at a speed of at least 25 mph (40 km/h).

Press CRUISE to turn the system off.

W
Improper use of cruise control can lead to a crash. Use cruise control only when traveling on open highways in good weather.

Adaptive Cruise Control (ACC)*1

Helps maintain a constant vehicle speed and a set following interval behind a vehicle detected ahead of yours.

Adaptive cruise control is not available when Snow, Mud*1 or Sand*1 is selected for Intelligent Traction Management (see Intelligent Traction Management System.

Activating and Setting the Vehicle Speed

  1. Press the MAIN button. The ACC indicator appears in the multi-information display.
  2. Accelerate to the desired speed (above 25 mph/40 km/h). Take your foot off the pedal and press the SET/- button to set the speed.

Adjusting the Vehicle Speed

Press the RES/+ button to increase speed or the SET/- button to decrease speed.

Each time you press the button, the vehicle speed is increased or decreased by about 1 mph (1.6 km/h). If you keep the button pressed, the vehicle speed increases or decreases by 5 mph or 5 km/h until you release it.

Adjusting the Vehicle Distance

Press the Interval button to change the following interval. Each time you press the button, the setting cycles through extra long, long, middle, and short.

During Operation

If a vehicle is detected ahead of you when ACC is turned on, the system maintains, accelerates, or decelerates your vehicle’s set speed to keep the vehicle’s set following interval from the vehicle ahead.
If a vehicle detected ahead of you slows down abruptly, or if another vehicle cuts in front of you, a beep sounds and BRAKE appears on the multi-information display to alert you.
W
ACC has limited braking capability.

When your vehicle speed drops below 22 mph (35 km/h), ACC will automatically cancel and no longer will apply your vehicle’s brakes.

Always be prepared to apply the brake pedal when conditions require.

Canceling ACC

Press the CANCEL or MAIN button, or press the brake pedal. The ACC indicator goes off.

Certain conditions may cause ACC to cancel automatically. When this happens, the amber ACC indicator appears on the multi-information display.

After cruise control has been canceled, you can still resume the prior set speed by pressing RES/+ when your vehicle speed is over 25 mph (40 km/h).

W
Improper use of ACC can lead to a crash.

Use ACC only when traveling on open highways in good weather.

Switching to Standard Cruise Control

Press and hold the Interval buttonfor one second.

Cruise Mode appears in the multi-information display. Press and hold the button again to switch back to ACC.

Lane Keeping Assist System (LKAS)*1

Provides steering input to help keep the vehicle in the middle of a detected lane as well as visual and tactile alerts if the vehicle is detected drifting out of its lane while driving between 45–90 mph (72–145 km/h).

If your vehicle is getting too close to detected left or right side lane markings without a turn signal activated, the system provides visual and tactile alerts.

A Lane Departure message appears on the multi-information display, and the steering wheel vibrates. Steering torque is also applied to help keep your vehicle within your driving lane. Take appropriate action to stay within your driving lane.

Turning the System On or Off

  1. Press the MAIN button. LKAS appears in the MID.
  2. Press the LKAS button. Lane outlines appear in the multi-information display. Dotted lane lines turn solid when the system activates.
  3. Press the MAIN button or the LKAS button to turn the system off.

Important Safety Reminder

LKAS is for your convenience only. It is not a substitute for your vehicle control. The system does not work if you take your hands off the steering wheel or fail to steer the vehicle.

Do not place an object on the top of the instrument panel. It may reflect onto the windshield and prevent the system from detecting lane lines properly.

Road Departure Mitigation (RDM)*1

Alerts and helps to assist you if the system determines a possibility of your vehicle unintentionally crossing over detected lane markings while driving between 45-90 mph (72-145km/h).

If your vehicle is getting too close to detected lane markings without a turn signal activated, a message appears in the multi-information display. Steering wheel torque and vibrations are applied to help your vehicle stay in the lane.

Braking may also be applied if the lane lines are solid and continuous.

If the system operates several times without detecting driver response, the system beeps to alert you.

Turning the System On or Off

Press the RDM button to turn the system on or off. A green indicator appears on the button when the system is on.

Changing Settings

Determine the warning timing.

  1. From the HOME screen, select Settings.
  2. Select Vehicle.
  3. Select Driver Assist System Setup.
  4. Select Road Departure Mitigation Setting.
  5. Select from the options.
  6. Press Save.

Important Safety Reminder

The RDM system has limitations. Over-reliance on it may result in a collision. It is always your responsibility to keep your vehicle within the driving lane.

Collision Mitigation Braking System™ (CMBS™)*1

Can assist you when there is a possibility of your vehicle colliding with a vehicle or a pedestrian detected in front of yours.

The system can give you visual, audible, and tactile alerts when a potential collision is determined, and reduce your vehicle speed to help minimize collision severity when a collision is deemed unavoidable.

The system activates when:
  • The speed difference between your vehicle and a vehicle or pedestrian detected in front of you is about 3 mph (5 km/h) and over with a chance of a collision.

  • Your vehicle speed is about 62 mph (100 km/h) or less and there is a chance of a collision with an oncoming detected vehicle or a pedestrian in front of you.

Alert Stages

The system has three alert stages for a possible collision. Depending on the circumstances or CMBS settings, CMBS may not go through all of the stages before initiating the last stage.

Stage 1: Visual and audible warning , steering wheel vibrations

Stage 2: Visual and audible warning, light brake application

Stage 3: Visual and audible warning, strong brake application

Changing Settings

Determine the warning timing.

  1. From the HOME screen, select Settings.
  2. Select Vehicle. The vehicle must be in Park (P).
  3. Select Forward Collision Warning Distance.
  4. Select Long, Normal, or Short.
  5. Press BACK to exit the menu.

Turning CMBS On or Off

Press and hold the CMBS OFF button. A beep sounds and a message appears in the MID. The CMBS indicator appears when the system is off.

Important Safety Reminder

CMBS is designed to reduce the severity of an unavoidable collision. It does not prevent collisions nor stop the vehicle automatically. It is still your responsibility to operate the brake pedal and steering wheel appropriately according to the driving conditions.

Blind Spot Information*1

Alerts you to a detected vehicle in your left or right blind spot while driving 20 mph (32 km/h) or higher.

When a vehicle is detected in your blind spot, the blind spot indicator turns on and stays lit until the area is clear.

When your turn signal is on and a vehicle is detected, the blind spot indicator blinks and a beep sounds until the area is clear or the turn signal is off.

Changing Settings

Determine the warning type, or turn the system off.

  1. From the Home screen, select Settings.
  2. Select Vehicle. The vehicle must be in Park (P).
  3. Select Driver Assist System Setup.
  4. Select an alert type, or turn the system off.
  5. Press BACK to exit the menu.

Important Safety Reminder

Like all assistance systems, the blind spot information system has limitations. Over-reliance on the system may result in a collision. The system is for your convenience only.
W

Failure to visually confirm that it is safe to change lanes before doing so may result in a crash and serious injury or death. Do not rely only on the blind spot information system when changing lanes.

Always look in your mirrors, to either side of your vehicle, and behind you for other vehicles before changing lanes.

LaneWatch™*1

Check the passenger-side rear areas in the display when the right turn signal is activated.

Activating LaneWatch

Activate the right turn signal. The LaneWatch display appears. Check the display for blind spots, and visually confirm that it is safe to change lanes.

You can also press the LaneWatch button on the end of the turn signal switch to view a constant real-time display. Press it again to turn the display off.

Changing Settings

Customize the display and how and when the display appears.

  1. From the Home screen, select Settings.
  2. Select Camera.
  3. Select LaneWatch.
  4. Select an option and make the preferred changes.
  5. Press BACK to exit the menu.
W
Failure to visually confirm that it is safe to change lanes before doing so may result in a crash and serious injury or death. Do not rely only on LaneWatch while driving. Always look in your mirrors, to either side of your vehicle, and behind you for other vehicles before changing lanes.

Important Safety Reminder

Like all assistance systems, LaneWatch has limitations. Over-reliance on the system may result in a collision.

Parking Sensor System*1

The corner and center sensors monitor obstacles near your vehicle. The beeper and audio/information screen let you know the approximate distance between your vehicle and the obstacle.

Turning the System On or Off

Press the parking sensor button to turn the system on or off. A green indicator light appears on the button when the system is on.

Cross Traffic Monitor*1

Alerts you if a detected vehicle is approaching from a rear corner when your vehicle is in Reverse (R) at speeds of 3 mph (5 km/h) or lower.

The system does not provide alerts for a vehicle that is moving away from your vehicle, and it may not detect pedestrians, bicycles, or stationary objects.

Turning the System On or Off

  1. From the HOME screen, select Settings.
  2. Select Camera.
  3. Select Cross Traffic Monitor.
  4. Select On or Off.
  5. Select OK.

You can also select the icon on the lower right corner of the screen when the monitor is on to turn it off.

C

This system cannot detect all approaching vehicles and may not detect an approaching vehicle at all.

Failure to visually confirm that it is safe to back up the vehicle before doing so may result in a collision.

Do not solely rely on the system when reversing; always also use your mirrors, and look behind and to the sides of your vehicle before reversing.

Multi-View Rear Camera

When you shift into Reverse (R), a real-time image of the area behind your vehicle is shown in the upper display, along with helpful parking guidelines.

Changing Settings

Turn the guidelines on or off.

Models with Color Audio

  1. Press the MENU/CLOCK button.
  2. Select Settings.
  3. Select Rear Camera.
  4. Select Camera Guidelines.
  5. Select On or Off.
  6. Press the Back button to exit the menus.

Models with Display Audio

  1. From the HOME screen, select Settings.
  2. Select Camera.
  3. Select one of the options.
  4. Fixed Guidelines: Guidelines appear when you change the gear to Reverse. Select On of Off.

    Dynamic Guidelines: Guidelines move as you turn the steering wheel. Select On or Off.

  5. Press BACK to exit the menu.

The rear camera view is restricted. You cannot see the corner ends of the bumper or what is underneath the bumper. Its unique lens also makes objects appear closer or farther than they actually are.

Visually confirm that it is safe to drive before backing up. Certain conditions (such as weather, lightning, and high temperatures) may also restrict the rear view. Do not rely on the rearview display, which does not give you all the information about conditions at the rear of your vehicle.

Improving Fuel Economy and Reducing CO2 Emissions

Achieving fuel economy and reducing CO2 emissions is dependent on several factors, including driving conditions, load weight, idling time, driving habits, and vehicle condition. Depending on these and other factors, you may not achieve the rated fuel economy of this vehicle.

Refueling

Use the proper fuel and refueling procedure to ensure the best performance and safety of your vehicle.

Fuel Information

Use of unleaded gasoline of 87 octane or higher is recommended.

  • Honda recommends TOP TIER Detergent Gasoline where available.
  • Do NOT use gasoline containing more than 15% ethanol.
  • Do NOT use gasoline containing methanol.
  • Do NOT use gasoline containing MMT.
    Notice We recommend quality gasoline containing detergent additives that help prevent fuel system and engine deposits. In addition, in order to maintain good performance, fuel economy, and emissions control, we strongly recommend the use of gasoline that does NOT contain harmful manganese-based fuel additives such as MMT, if such gasoline is available.

How to Refuel

The fuel fill door is located at the left rear of the vehicle. Park next to the service pump that is most accessible.

  1. The fuel fill door is located at the left rear of the vehicle. Park next to the service pump that is most accessible.
  2. Turn off the engine.
  3. Press the fuel fill door release button on the driver's door. The fuel fill door opens.
  4. Place the end of the filler nozzle on the lower part of the filler opening, then insert it slowly and fully.
  5. After filling, wait about 5 seconds before removing the filler nozzle. Close the fuel fill door by hand.

W
Gasoline is highly flammable and explosive. You can be burned or seriously injured when handling fuel.

Stop the engine, and keep heat, sparks, and flame away.

Handle fuel only outdoors.

Wipe up spills immediately.

Notice The fuel filler opening is designed to accept only service station filler nozzles for refueling. Use of smaller diameter tubes (e.g., to siphon fuel for other uses) or other non-service station devices can damage the area in and around the filler opening.

Refueling from a Portable Fuel Container

If you need to refuel your vehicle from a portable fuel container, use the funnel provided with your vehicle.
  1. Turn off the engine.
  2. Press the fuel fill door release button. The fuel fill door opens.
  3. Open the in-bed trunk and pull out the tire tray.
  4. Remove the funnel from the tool box.
  5. Place the end of the funnel on the lower part of the filler opening, then insert it slowly and fully. Make sure that the end of the funnel goes down along with the filler pipe.
  6. Fill the tank with fuel from the portable fuel container. Pour fuel carefully so you do not spill any.
  7. Remove the funnel from the filler neck. Wipe up any fuel from the funnel before storing it.
  8. Shut the fuel fill door by hand.
Notice Do not insert the nozzle of a portable fuel container or any funnel other than the one provided with your vehicle. Doing so can damage the fuel system. Do not try to pry open or push open the sealed fuel tank with foreign objects. This can damage the fuel system and its seal.