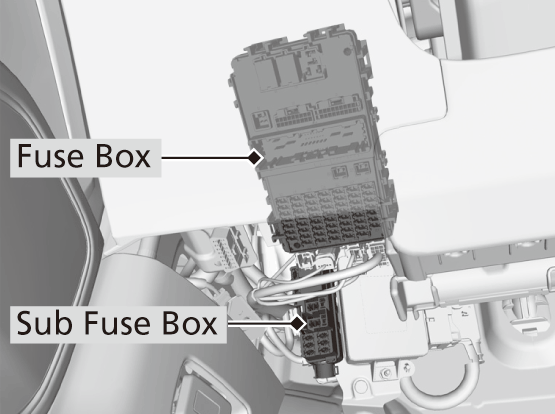
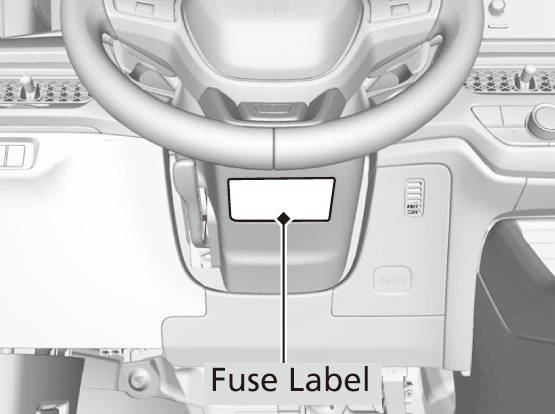
Fuse Locations
If any electrical devices are not working, set the power mode to VEHICLE OFF and check to see if any applicable fuse is blown.
Engine Compartment Fuse Box
Located near the battery. Push the tabs to open the box.
Fuse locations are shown on the fuse box cover. Locate the fuse in question by the fuse number and box cover number.
Circuit protected and fuse rating
|
Circuit Protected
|
Amps
|
|
|---|---|---|
|
1
|
BATTERY
|
125 A
|
|
2
|
-
|
40 A
|
|
-
|
40 A
|
|
|
F/BOX OPTION
|
60 A
|
|
|
-
|
40 A
|
|
|
F/BOX OPTION2
|
40 A
|
|
|
DC/DC2
|
30 A
|
|
|
F/BOX MAIN
|
60 A
|
|
|
3
|
-
|
30 A
|
|
-
|
30 A
|
|
|
-
|
70 A
|
|
|
RR DEFROSTER
|
30 A
|
|
|
-
|
40 A
|
|
|
-
|
30 A
|
|
|
HTR MTR
|
40 A
|
|
|
4
|
-
|
30 A
|
|
ABS/VSA MTR
|
40 A
|
|
|
DC/DC
|
30 A
|
|
|
-
|
30 A
|
|
|
IG MAIN
|
30 A
|
|
|
R/M1
|
30 A
|
|
|
R/M2
|
30 A
|
|
|
5
|
ST MAGNETIC SW
|
30 A
|
|
WIPER
|
30 A
|
|
|
EPS
|
70 A
|
|
|
-
|
30 A
|
|
|
ABS/VSA FSR
|
40 A
|
|
|
MAIN FAN
|
30 A
|
|
|
F/BOX MAIN2
|
40 A
|
|
|
6
|
SUB FAN
|
(30 A)
|
|
7
|
IG MAIN2
|
30 A
|
|
8
|
-
|
(7.5 A)
|
|
9
|
EVP*
|
(30 A)
|
|
10
|
-
|
(7.5 A)
|
|
11
|
-
|
-
|
|
12
|
-
|
-
|
|
13
|
H/STRG BATT SNSR
|
10 A
|
|
14
|
-
|
-
|
|
15
|
FR FOG*
|
(10 A)
|
|
16
|
MG CLUTCH
|
10 A
|
|
17
|
WASHER
|
15 A
|
|
18
|
HORN
|
15 A
|
|
19
|
BACK UP
|
15 A
|
|
20
|
AUDIO
|
(15 A)
|
|
21
|
RFC RLY CL+
|
(7.5 A)
|
|
22
|
DBW
|
15 A
|
|
23
|
-
|
-
|
|
24
|
BACKUP FI-ECU
|
10 A
|
|
25
|
IGP
|
15 A
|
|
26
|
TCU*
|
(15 A)
|
|
27
|
LCM L
|
15 A
|
|
28
|
INJ
|
(15 A)
|
|
29
|
STOP
|
10 A
|
|
30
|
LCM R
|
15 A
|
|
31
|
IG COIL
|
15 A
|
|
32
|
-
|
-
|
|
33
|
HAZARD
|
15 A
|
|
34
|
AUDIO SUB VST
|
(7.5 A)
|
|
35
|
-
|
-
|
|
36
|
AUDIO VST MAIN
|
(30 A)
|
|
37
|
BACKUP2
|
(30 A)
|
|
38
|
-
|
-
|
|
39
|
-
|
-
|
|
40
|
VBACT
|
(10 A)
|
|
41
|
IGPS [LAF]
|
10 A
|
|
42
|
IG1 MON2
|
(7.5 A)
|
Interior Fuse Box
Located under the dashboard.
Fuse locations are shown on the label under the steering column.
Locate the fuse in question by the fuse number and label number.
Circuit protected and fuse rating
|
Circuit Protected
|
Amps
|
|
|---|---|---|
|
1
|
P/W DR
|
20 A
|
|
2
|
P/W AS
|
20 A
|
|
3
|
P/W RR R
|
20 A
|
|
4
|
P/W RR L
|
20 A
|
|
5
|
OPTION
|
10 A
|
|
6
|
SRS
|
10 A
|
|
7
|
T/G MTR / TRUNK ACT
|
10 A
|
|
8
|
IDAS / HUD
|
(10 A)
|
|
9
|
FR ACC SOCKET
|
20 A
|
|
10
|
DOOR LOCK
|
20 A
|
|
11
|
METER
|
10 A
|
|
12
|
OPTION3 (ST CUT)
|
10 A
|
|
13
|
-
|
-
|
|
14
|
OPTION6 (VB SOL)
|
10 A
|
|
15
|
DR DOOR UNLOCK
|
10 A
|
|
16
|
SUNROOF
|
20 A
|
|
17
|
-
|
-
|
|
18
|
-
|
-
|
|
19
|
-
|
-
|
|
20
|
-
|
-
|
|
21
|
-
|
-
|
|
22
|
SMART
|
10 A
|
|
23
|
DR DOOR LOCK
|
10 A
|
|
24
|
-
|
-
|
|
25
|
IMG
|
10 A
|
|
26
|
SRS
|
10 A
|
|
27
|
ST CUT RLY
|
10 A
|
|
28
|
OPTION5
|
10 A
|
|
29
|
FUEL PUMP
|
15 A
|
|
30
|
L SIDE DOOR UNLOCK
|
10 A
|
|
31
|
R SIDE DOOR UNLOCK
|
10 A
|
|
32
|
-
|
-
|
|
33
|
-
|
-
|
|
34
|
-
|
-
|
|
35
|
-
|
-
|
|
36
|
-
|
-
|
|
37
|
-
|
-
|
|
38
|
-
|
-
|
|
39
|
R SIDE DOOR LOCK
|
10 A
|
|
40
|
P/SEAT REC / RR HI
|
20 A
|
|
41
|
P/SEAT SLIDE / FR HI
|
20 A
|
|
42
|
BACK LT
|
(7.5 A)
|
|
43
|
A/C
|
10 A
|
|
44
|
DRL
|
10 A
|
|
45
|
ACC
|
10 A
|
|
46
|
ACC KEY LOCK
|
10 A
|
|
47
|
L SIDE DOOR LOCK
|
10 A
|
|
48
|
H/SEAT
|
20 A
|
|
49
|
AS P/SEAT REC*
|
(20 A)
|
|
50
|
P/LUMBAR DR*
|
(10 A)
|
|
51
|
-
|
-
|
|
52
|
RR H/SEAT*
|
(20 A)
|
|
53
|
AS P/SEAT SLI*
|
(20 A)
|
|
54
|
OPTION1 / FUEL LID
|
10 A
|
|
55
|
AUDIO AMP*
|
(30 A)
|
|
56
|
ADS*
|
(30 A)
|
Sub Fuse Box
|
Circuit Protected
|
Amps
|
|
|---|---|---|
|
A
|
BACKUP2 MAIN
|
(10 A)
|
|
B
|
AUDIO SUB VST
|
(7.5 A)
|
|
C
|
ACC VST
|
(10 A)
|
|
D
|
VST 1
|
(10 A)
|
|
E
|
AUDIO VST
|
(15 A)
|
|
F
|
EOP
|
(20 A)
|
|
G
|
-
|
-
|
|
H
|
VST 2
|
(10 A)
|
* Not available on all models
Inspecting and Changing Fuses
-
- Set the power mode to VEHICLE OFF. Turn headlights and all accessories off.
- Remove the fuse box cover.
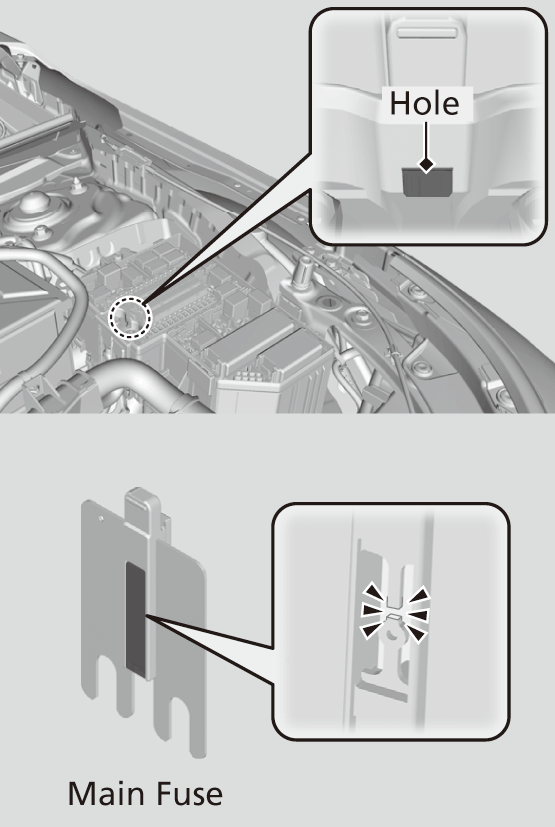
- Check the main fuse in the engine compartment fuse box.
- Look at the fuse through the hole.
- If the fuse is blown, have it replaced by a dealer.
-
-
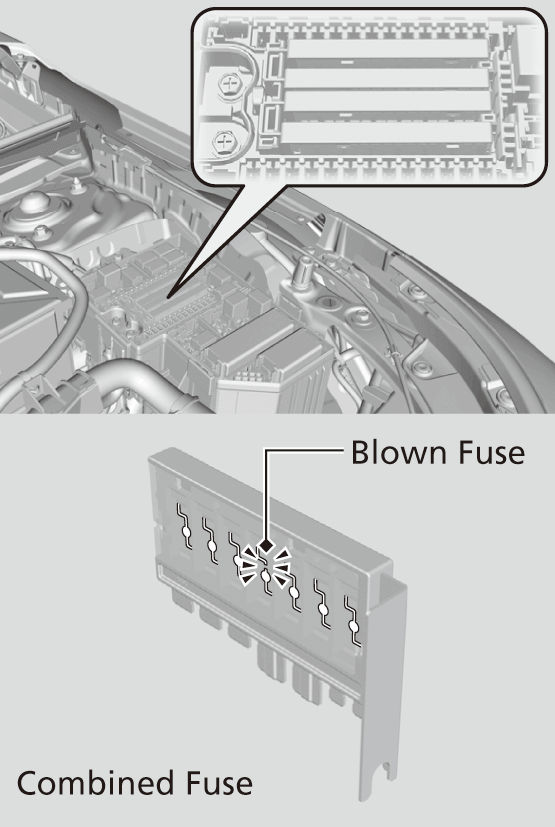
- Check the combined fuses in the engine compartment fuse box.
- Look into the space between the fuses.
- If the fuse is blown, have it replaced by a dealer.
- Check the combined fuses in the engine compartment fuse box.
-
-
- Inspect the small fuses in the engine compartment and the vehicle interior.
- If there is a blown fuse, remove it with the fuse puller and replace it with a new one.
- Inspect the small fuses in the engine compartment and the vehicle interior.
-
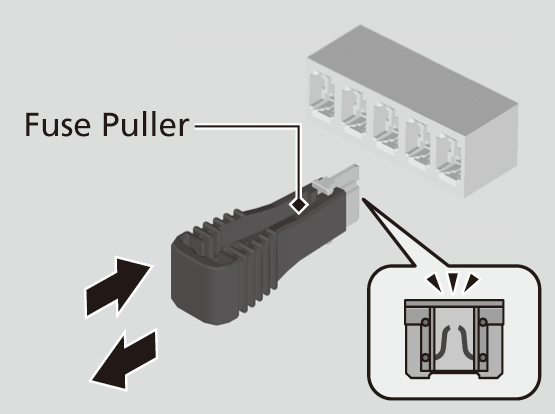
- Detail
-
NOTICE
Replacing a fuse with one that has a higher rating greatly increases the chances of damaging the electrical system.
Use the charts to locate the fuse in question and confirm the specified amperage on the fuse label.
Replace a fuse with a spare fuse of the same specified amperage.There is a fuse puller on the back of the engine compartment fuse box cover.
- Recommended topic(s)


